【Raspberry Pi】【AVS Device SDK】ラズパイでAlexaする
自宅でのスマートホーム化はすでにやっていますが、
engetu21.hatenablog.com
Alexa使ってみたかったのでやり方のメモ。
本記載は2018/8/20時点の内容です。
なお、使うのはAVS Device SDK(ver1.8.1)です。(https://github.com/alexa/avs-device-sdk)
そのため、先駆者の皆様とは手順が若干異なります。
具体的には
・製品登録時の「許可された出荷地」にhttp://localhost:3000を設定
とか、
・ラズパイのデスクトップでブラウザ開いて認証を進める
とかはやりません。
以下の手順は、すべてラズパイとは別のマシンでSSH等で操作した記録です。
※2018/10/1追記
↑のリンクで実施しているJulius-plusと同じラズパイ上での共存についてですが、
それぞれscreenで仮想端末を作ったうえで
①AVS Device SDKのstartsample.shを実行
②Julius-plusを実行
としないとダメなようです。
Julius-plusが動いている状態でstartsample.shを実行すると、startsample.shが強制終了します。
(逆だと大丈夫なのが謎)
※追記:OKグーグルもやってみました。
engetu21.hatenablog.com
1.製品登録をする
以下のAmazon Developerのサイトにアクセスして製品登録します。
といっても本当に製品を登録するわけではなく、Alexaを利用するための下ごしらえみたいなものなので、この時点でラズパイが用意出来てなくても問題ありません。
https://developer.amazon.com/avs/home.html#/avs/home
※Amazon Developerアカウントを作成していなければここで作成しておく。
というかすでにAmazonアカウントを持っていれば、多分それが使えるはず。
「ALEXA VOICE SERVICE」タブを押してメニューを開き、「製品を作成する」を押す

・製品名
適当でいい。私は「raspi3」としました。
・製品ID
適当でいい。私は「raspi3」としました。
なお、この設定は2項で使います。
・製品はアプリやデバイスを使用しますか ?
「端末」を選択
・商品カテゴリー
適当でたぶん大丈夫。とりあえず「家電」を選択。
・製品概要
適当に、「家電操作など」
・エンドユーザーは、商品とどのようにやり取りするのでしょうか ?
どれかを選択すれば問題なさそう。
「ハンズフリー」
「ファーフィールド」
を選択。
・画像をアップロード
特にいらないので、何もいらない。
・この製品を商品として配信する予定ですか ?
「いいえ」を選択
・これは子供向け商品、それ以外は13歳以下の子供向けですか ?
「いいえ」を選択
次にセキュリティの設定を行う。
・セキュリティプロファイル
適当に入れる。
・セキュリティプロファイルの説明
適当に入れる。
これによってクライアントIDとクライアントシークレットが作成されます。
が、作成されたものは使いません。
同様に他ブログで書かれている「許可された出荷地」「許可された返品URL」にも
「http://localhost:3000」といった内容も設定しません。
おそらく「ウェブ」というタブでそこらへんが表示されていると思いますが、
使うのは「他のデバイスやプラットフォーム」のタブです。


クライアントID名は「raspi3」としてボタンを押せば、勝手にIDが生成されます。
今回はそれを使います。
一度、「ウェブ」に記載されているクライアントIDで実施しましたが、それだと認証が通りません。
詳しくはここら辺見てください。
https://github.com/alexa/avs-device-sdk/issues/743
2.ラズパイにAVS Device SDKをセッティング
AVS Device SDKにはラズパイ向けのクイックスタートページがあるため、それを元にインストールします。
https://github.com/alexa/avs-device-sdk/wiki/Raspberry-Pi-Quick-Start-Guide-with-Script
とりあえず、各種ソフトを更新
$ sudo apt update
$ sudo apt upgrade
ホームディレクトリにディレクトリを作ります。名前は何でもいい。
・セットアップ用にファイルを落とします。
$ wget https://raw.githubusercontent.com/alexa/avs-device-sdk/master/tools/Install/setup.sh && wget https://raw.githubusercontent.com/alexa/avs-device-sdk/master/tools/Install/config.txt && wget https://raw.githubusercontent.com/alexa/avs-device-sdk/master/tools/Install/pi.sh
configファイルを変更します。
$ vi config.txt
#NOTE: The Device Serial Number can be any unique number
DEVICE_SERIAL_NUMBER="123456"
CLIENT_ID="************************"
PRODUCT_ID="raspi3"
DEVICE_SERIAL_NUMBERは適当でいいです。というかデフォルトのままでOK。
CLIENT_IDには1項の最後に書いた「他のデバイスやプラットフォーム」のタブに記載されたクライアントIDを設定します。
PRODUCT_IDは製品IDとして指定したraspi3を設定します。
シェルスクリプトの実行権限を変更します。
$ sudo chmod 755 pi.sh setup.sh startsample.sh
pipが入っていないかも知れないので、インストールしておきます。
(セットアップ実行時に止まってしまったので順序としてここに入れておく)
$ curl -kL https://bootstrap.pypa.io/get-pip.py | sudo python3
・セットアップ実行
$ sudo ./setup.sh config.txt
################################################################################
################################################################################
AVS Device SDK Raspberry Pi Script - Terms and Agreements
The AVS Device SDK is dependent on several third-party libraries, environments,
and/or other software packages that are installed using this script from
third-party sources ("External Dependencies"). These are terms and conditions
associated with the External Dependencies
(available at https://github.com/alexa/avs-device-sdk/wiki/Dependencies) that
you need to agree to abide by if you choose to install the External Dependencies.
If you do not agree with every term and condition associated with the External
Dependencies, enter "QUIT" in the command line when prompted by the installer.
Else enter "AGREE".
################################################################################
################################################################################※[AGREE]と入力し、Enter
勝手にインストールが始まる。
途中でライセンス承認などの対応が必要。(Enter押したりyesと入力したり)
また、git cloneを自動で実行し、GitHubから「avs-device-sdk」の取得模様。
(おそらくhttps://github.com/alexa/avs-device-sdkからDLしている)
gitのインストールはすでにやっていたが、これも事前にやっておいたほうがいいかは不明。
終わったら以下のように表示される。
**** Completed Configuration/Build ***
■startsample.shを実行(この段階では動かない)
$ sudo ./startsample.sh
2018-08-18 16:01:09.545 [ 1] I sdkVersion: 1.8.1
configFile /home/pi/avs-sdk/build/Integration/AlexaClientSDKConfig.json
Running app with log level: DEBUG9
2018-08-18 16:01:09.560 [ 1] 0 ConfigurationNode:initializeSuccess
2018-08-18 16:01:09.572 [ 1] 9 MediaPlayer:createCalled
2018-08-18 16:01:09.612 [ 1] E MediaPlayer:setupPipelineFailed:reason=createAudioSinkElementFailed,audioSinkElement=alsasink
2018-08-18 16:01:09.612 [ 1] E MediaPlayer:initPlayerFailed:reason=setupPipelineFailed
2018-08-18 16:01:09.612 [ 1] 9 MediaPlayer:~MediaPlayerCalled(SampleApp:15078): GStreamer-CRITICAL **: gst_object_unref: assertion 'object != NULL' failed
2018-08-18 16:01:09.612 [ 1] 9 MediaPlayer:resetPipeline(SampleApp:15078): GLib-CRITICAL **: g_main_context_find_source_by_id: assertion 'source_id > 0' failed
2018-08-18 16:01:09.612 [ 1] E RequiresShutdown:~RequiresShutdownFailed:reason=notShutdown,name=SpeakMediaPlayer
2018-08-18 16:01:09.613 [ 1] C SampleApplication:Failed to create media player for speech!
2018-08-18 16:01:09.613 [ 1] C SampleApplication:Failed to initialize SampleApplication
Failed to create to SampleApplication!
動かないっぽいので、質問サイトを元に gstreamer1.0-alsa をインストールします。
https://github.com/alexa/avs-device-sdk/issues/643
$ sudo apt install gstreamer1.0-alsa
・再度実行
$ sudo ./startsample.sh
※実行中の以下の内容をメモする。
##################################
# NOT YET AUTHORIZED #
##################################################################################################################################
# To authorize, browse to: 'https://amazon.com/us/code' and enter the code: XXXXX #
################################################################################################Checking for authorization (x)...
先駆者たちの記録を見ると、どうやらこのURL部分が「許可された出荷地」で設定した「http://localhost:3000」になるらしい。
上記URLにアクセスしても実際にはAmazonのページに遷移するだけみたいですが、
localhostに接続するんだったら、確かにラズパイ上のGUIでやらないとダメですね。
まぁ、今回の手順では関係ありませんが。
指定されたURLにアクセスします。インターネットに繋がるどのマシンからでも問題ありません。
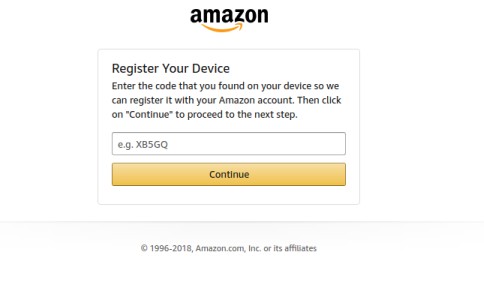
URLと共に表示された「code」を入力し、Continueを押します。

問題なければAllowを押します。

コードが認証されれば以下のようにラズパイCLIに出力されます。
##################################################
# Checking for authorization (32)... #
##################################################2018-08-18 16:55:20.233 [ 2] 5 HttpPost:doPostSucceeded:code=400
2018-08-18 16:55:20.233 [ 2] 5 CBLAuthDelegate:receiveTokenResponse:code=400
2018-08-18 16:55:20.234 [ 2] 5 CBLAuthDelegate:mapHTTPStatusToError:code=400,error=INVALID_REQUEST
2018-08-18 16:55:20.234 [ 2] 5 CBLAuthDelegate:errorInLwaResponseBody:error=authorization_pending,errorCode=AUTHORIZATION_PENDING
2018-08-18 16:55:20.234 [ 2] 5 CBLAuthDelegate:setAuthError:authError=AUTHORIZATION_PENDING
2018-08-18 16:55:20.234 [ 2] 0 CBLAuthDelegate:receiveTokenResponseFailed:result=AUTHORIZATION_PENDING
##################################################
# Checking for authorization (33)... #
##################################################2018-08-18 16:55:25.235 [ 2] 5 CBLAuthDelegate:requestToken
2018-08-18 16:55:25.847 [ 2] 5 HttpPost:doPostSucceeded:code=200
2018-08-18 16:55:25.847 [ 2] 5 CBLAuthDelegate:receiveTokenResponse:code=200
3.サンプルを動かしてみる。
サンプルといっても、Alexaを呼び出すにはこれで十分なんですが。
$ sudo ./startsample.sh

                  #    #     #  #####      #####  ######  #    #
                 # #   #     # #     #    #     # #     # #   #
                #   #  #     # #          #       #     # #  #
               #     # #     #  #####      #####  #     # ###
               #######  #   #        #          # #     # #  #
               #     #   # #   #     #    #     # #     # #   #
               #     #    #     #####      #####  ######  #    #

       #####                                           #
      #     #   ##   #    # #####  #      ######      # #   #####  #####
      #        #  #  ##  ## #    # #      #          #   #  #    # #    #
       #####  #    # # ## # #    # #      #####     #     # #    # #    #
            # ###### #    # #####  #      #         ####### #####  #####
      #     # #    # #    # #      #      #         #     # #      #
       #####  #    # #    # #      ###### ######    #     # #      #

       SDK Version 1.8.1

+----------------------------------------------------------------------------+
|                                  Options:                                  |
| Wake word:                                                                 |
|       Simply say Alexa and begin your query.                               |
| Tap to talk:                                                               |
|       Press 't' and Enter followed by your query (no need for the 'Alexa').|
| Hold to talk:                                                              |
|       Press 'h' followed by Enter to simulate holding a button.            |
|       Then say your query (no need for the 'Alexa').                       |
|       Press 'h' followed by Enter to simulate releasing a button.          |
| Stop an interaction:                                                       |
|       Press 's' and Enter to stop an ongoing interaction.                  |
| Privacy mode (microphone off):                                             |
|       Press 'm' and Enter to turn on and off the microphone.               |
| Echo Spatial Perception (ESP): This is for testing purpose only!           |
|       Press 'e' followed by Enter at any time to adjust ESP settings.      |
| Playback Controls:                                                         |
|       Press '1' for a 'PLAY' button press.                                 |
|       Press '2' for a 'PAUSE' button press.                                |
|       Press '3' for a 'NEXT' button press.                                 |
|       Press '4' for a 'PREVIOUS' button press.                             |
| Settings:                                                                  |
|       Press 'c' followed by Enter at any time to see the settings screen.  |
| Speaker Control:                                                           |
|       Press 'p' followed by Enter at any time to adjust speaker settings.  |
| Firmware Version:                                                          |
|       Press 'f' followed by Enter at any time to report a different        |
|       firmware version.                                                    |
| Info:                                                                      |
|       Press 'i' followed by Enter at any time to see the help screen.      |
| Reset device:                                                              |
|       Press 'k' followed by Enter at any time to reset your device. This   |
|       will erase any data stored in the device and you will have to        |
|       re-register your device.                                             |
|       This option will also exit the application.                          |
| Quit:                                                                      |
|       Press 'q' followed by Enter at any time to quit the application.     |
+----------------------------------------------------------------------------+

#############################
#       Connecting...       #
#############################
###########################
#       Authorized!       #
###########################
########################################
#       Alexa is currently idle!       #
########################################
正常に動いてますね!
この状態で「Alexa」としゃべるか「t」を入力することで、音声入力待ちの状態になります。
ただし、日本語で受け答えするには4項の対応が必要です。
なお、config.txtの設定が誤ってたりすると以下のように限定的な動作になるようです。
###############################################################
#       UNRECOVERABLE CAPABILITIES API ERROR: FORBIDDEN       #
#       Entering limited interaction mode.                    #
###############################################################

+----------------------------------------------------------------------------+
|                          In Limited Mode:                                  |
+----------------------------------------------------------------------------+
| Status : Unrecoverable Capabilities API call failure.                      |
+----------------------------------------------------------------------------+
| Info:                                                                      |
|       Press 'i' followed by Enter at any time to see the help screen.      |
| Stop an interaction:                                                       |
|       Press 's' and Enter to stop an ongoing interaction.                  |
| Privacy mode (microphone off):                                             |
|       Press 'm' and Enter to turn on and off the microphone.               |
| Speaker Control:                                                           |
|       Press 'p' followed by Enter at any time to adjust speaker settings.  |
| Reset device:                                                              |
|       Press 'k' followed by Enter at any time to reset your device. This   |
|       will erase any data stored in the device and you will have to        |
|       re-register your device.                                             |
|       This option will also exit the application.                          |
| Quit:                                                                      |
|       Press 'q' followed by Enter at any time to quit the application.     |
+----------------------------------------------------------------------------+
4.日本語に対応させる。
$ sudo ./startsample.sh
で、起動後に

>c
+----------------------------------------------------------------------------+
|                          Setting Options:                                  |
| Change Language:                                                           |
|       Press '1' followed by Enter to see language options.                 |
+----------------------------------------------------------------------------+


>1
+----------------------------------------------------------------------------+
|                          Language Options:                                 |
|                                                                            |
| Press '1' followed by Enter to change the language to US English.          |
| Press '2' followed by Enter to change the language to UK English.          |
| Press '3' followed by Enter to change the language to German.              |
| Press '4' followed by Enter to change the language to Indian English.      |
| Press '5' followed by Enter to change the language to Canadian English.    |
| Press '6' followed by Enter to change the language to Japanese.            |
| Press '7' followed by Enter to change the language to Australian English.  |
| Press '8' followed by Enter to change the language to French.              |
+----------------------------------------------------------------------------+


>6
###################################
#       locale set to ja-JP       #
###################################
で、日本語化完了。
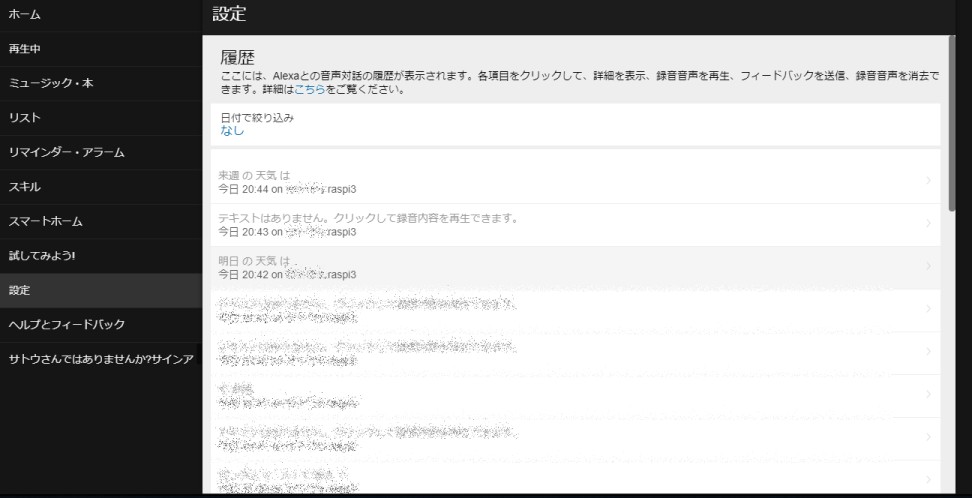
5.Web上のAlexa設定画面でタイムゾーンを変える
Alexaの設定でタイムゾーンを日本のものにすることで、今何時?とかに正確に答えてくれるようになります。
https://alexa.amazon.co.jp/spa/index.html

なお、本ページではAlexaと話したことが履歴として見れます。
ピカチュウと話した内容は録音はしてるけどテキストとしては残してない模様。
6.ウェイクアップワードの反応が鈍いのでライブラリを変えてみる。
「アレクサ!」と話しかけても全然反応しない。
待機画面で「t」を入力することで代用可能ですが、流石にそれでは意味がない。
ライブラリはデフォルトではSensoryというのを使ってるみたいですが、snowboyというのがいいらしいのでそれに変えます。
※参考HP
Raspberry PiにAlexaを召喚する3つの方法 - Qiita
GitHub - Kitt-AI/snowboy: Future versions with model training module will be maintained through a forked version here: https://github.com/seasalt-ai/snowboy
http://yukidfg.jpn.ph/2018/02/20/%E3%83%A9%E3%82%BA%E3%83%91%E3%82%A4%E3%81%ABalexa%E3%82%92%E3%82%A4%E3%83%B3%E3%82%B9%E3%83%88%E3%83%BC%E3%83%AB%E3%81%99%E3%82%8B/
・Snowboyをダウンロード
$ cd ~/avs-sdk/third-party
$ sudo git clone https://github.com/Kitt-AI/snowboy.git
・libatlas(行列計算ライブラリらしい)をインストール
$ sudo apt install libatlas-base-dev
・setup.shの内容を変える。
cmakeの記述部分を変更する。以下の通り。
$ sudo vi ~/avs-sdk/setup.sh
cmake "$SOURCE_PATH/avs-device-sdk" \
"${CMAKE_PLATFORM_SPECIFIC[@]}" \
-DGSTREAMER_MEDIA_PLAYER=ON -DPORTAUDIO=ON \
-DPORTAUDIO_LIB_PATH="$THIRD_PARTY_PATH/portaudio/lib/.libs/libportaudio.$LIB_SUFFIX" \
-DPORTAUDIO_INCLUDE_DIR="$THIRD_PARTY_PATH/portaudio/include" \
-DCMAKE_BUILD_TYPE=DEBUG↓
cmake "$SOURCE_PATH/avs-device-sdk" \
"${CMAKE_PLATFORM_SPECIFIC[@]}" \
-DGSTREAMER_MEDIA_PLAYER=ON -DPORTAUDIO=ON \
-DPORTAUDIO_LIB_PATH="$THIRD_PARTY_PATH/portaudio/lib/.libs/libportaudio.$LIB_SUFFIX" \
-DPORTAUDIO_INCLUDE_DIR="$THIRD_PARTY_PATH/portaudio/include" \
-DCMAKE_BUILD_TYPE=DEBUG
-DKITTAI_KEY_WORD_DETECTOR=ON \
-DKITTAI_KEY_WORD_DETECTOR_LIB_PATH="$THIRD_PARTY_PATH/snowboy/lib/rpi/libsnowboy-detect.a" \
-DKITTAI_KEY_WORD_DETECTOR_INCLUDE_DIR="$THIRD_PARTY_PATH/snowboy/include" \
※一番最後の3行を追加
・startsample.shの内容を変更する。
$ sudo vi ~/avs-sdk/startsample.sh
./SampleApp "/home/pi/avs-sdk/build/Integration/AlexaClientSDKConfig.json" "/home/pi/avs-sdk/third-party/alexa-rpi/models" DEBUG9
↓
./SampleApp "/home/pi/avs-sdk/build/Integration/AlexaClientSDKConfig.json" "/home/pi/avs-sdk/third-party/snowboy/resources" DEBUG9
~
・alexa.umdlをsnowboy/resourcesにコピー
$ sudo cp -a ~/avs-sdk/third-party/snowboy/resources/alexa/alexa-avs-sample-app/alexa.umdl ~/avs-sdk/third-party/snowboy/resources/
・ビルドでエラーになるらしいところを修正。
$ sudo vi ~/avs-sdk/avs-device-sdk/KWD/KittAi/src/KittAiKeyWordDetector.cpp
m_maxSamplesPerPush{(audioFormat.sampleRateHz / HERTZ_PER_KILOHERTZ) * msToPushPerIteration.count()} {↓
m_maxSamplesPerPush{(audioFormat.sampleRateHz / HERTZ_PER_KILOHERTZ) * static_cast
(msToPushPerIteration.count())} {
→ここ、1.9.0で直ってるっぽいので対応不要で大丈夫な模様(2018/9/30)
$ sudo vi ~/avs-sdk/avs-device-sdk/build/cmake/BuildOptions.cmake
# Set up the compiler flags.
set(CMAKE_CXX_STANDARD 11)
set(CMAKE_CXX_STANDARD_REQUIRED ON)
set(CMAKE_CXX_EXTENSIONS OFF)した
# Set up the compiler flags.
add_definitions (-D_GLIBCXX_USE_CXX11_ABI=0) ←これを追加する
set(CMAKE_CXX_STANDARD 11)
set(CMAKE_CXX_STANDARD_REQUIRED ON)
set(CMAKE_CXX_EXTENSIONS OFF)
・ウェイクアップワード検知後に音を鳴らす。
$ sudo vi ~/avs-sdk/avs-device-sdk/SampleApp/src/UIManager.cpp
case DialogUXState::LISTENING:
ConsolePrinter::prettyPrint("Listening...");↓
case DialogUXState::LISTENING:
system("aplay ~/avs-sdk/third-party/snowboy/resources/dong.wav 1>/dev/null 2>/dev/null ");
ConsolePrinter::prettyPrint("Listening...");
・再ビルド
$ sudo ./setup.sh config.txt
**** Completed Configuration/Build ***
で無事完了
変えてみたけど、「アレクサ」というより、「ァルェクサァ」と英語的発音のほうが反応する模様。
こればっかりはしょうがないかなぁ。
なお、Snowboyの感度とボリュームの変更についてですが、SampleApplication.cppの
static const double KITT_AI_SENSITIVITY = 0.60;
static const float KITT_AI_AUDIO_GAIN = 2.0;
で設定されている値を変更すればいいと参考サイトには書いてありますが、
SDK1.7.0(Version 1.7.0 of the avs-device-sdk · alexa/avs-device-sdk@7bea05a · GitHub)の更新時に該当の定数定義は削除されているため、参考サイトの様に変更はできません。
じゃあどこでできるのかというと、これがわからず。
わかる人教えてください!
※2018/9/30追記
コメントで教えていただいたサイトを参考に、以下の設定でウェイクアップの感度を変えられる模様。
上野家のホームページ - 資料室 : PC/RaspberryPi/スマートスピーカー/alexaAVS Device SDKを動かしてみる
sudo vi ~/avs-sdk/avs-device-sdk/KWD/KWDProvider/src/KeywordDetectorProvider.cpp
/// The sensitivity of the Kitt.ai engine.
static const double KITT_AI_SENSITIVITY = 0.6;/// The audio amplifier level of the Kitt.ai engine.
static const float KITT_AI_AUDIO_GAIN = 2.0;↓
/// The sensitivity of the Kitt.ai engine.
static const double KITT_AI_SENSITIVITY = 0.70;/// The audio amplifier level of the Kitt.ai engine.
static const float KITT_AI_AUDIO_GAIN = 0.5;
※2018/10/1追記
クリーンインストールしたラズパイに、これまでの手順で設定してみたら、どうもAlexaが返事をしてくれない。
というより、返事はしてくれてるけど、音声を再生できてなさそう(aplayなどでwavファイルなどが普通に再生できることは確認済み)。
どうもgstreamerあたりが怪しいみたいなので、以下のサイトを参考にとりあえず片っ端からインストールしました。
saikoro-house.com
といっても、そのままのコマンドではなく、現状aptにあるのをひとまずインストール。
で、これまで入ってなかったのが、gstreamer1.0-libavで、これ入れたらAlexaが喋ってくれました。
$ sudo apt install gstreamer1.0-libav